10. Pipeline
Die Pipeline verbindet eine Vielzahl von Befehlen zusammen; das Ergebnis eine Befehls wird als Eingabewert für den nächsten Befehl verwendet, solange, bis das gewünschte Ergebnis erreicht ist.
test
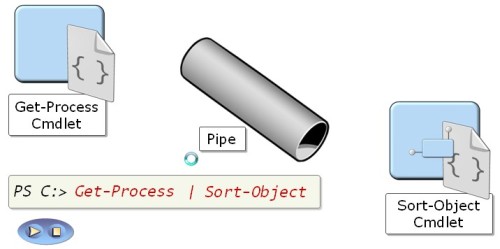
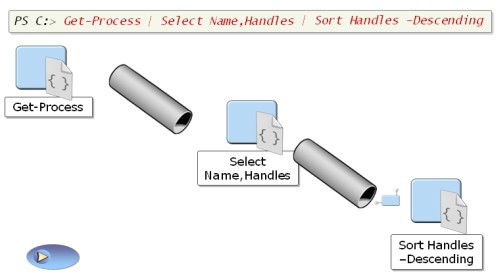
Während es auch schon zu DOS-Zeiten das Konzept des Pipens gab und auch Unix-Shells heftig davon Gebrauch machen, gibt es doch einen gravierenden Unterschied zu diesen alten Implementierungen. Während in der alten Zeit Strings als Tauschformat benutzt wurden, verwendet die Powershell echte Objekte. Die Eigenschaften und Methoden der transportierten Objekte bleiben dabei erhalten.
Dir | Sort-Object Length | Select-Object Name, Length |
ConvertTo-Html | Out-File report.htm
.\report.htm
Bis zuletzt bleiben die Ergebnisse Objekte, von denen relativ leicht bestimmte Eigenschaften (Name, Length) ausgegeben werden können
Zitat
“What you see here is a true object-oriented pipeline so the results from a command remain rich objects. Only at the end of the pipeline will the results be reduced to text or HTML or whatever you choose for output. Take a look at Sort-Object. It sorts the directory listing by file size. If the pipeline had simply fed plain text into Sort-Object, you would have had to tell Sort-Object just where the file size information was to be found in the raw text. You would also have had to tell Sort-Object to sort this information numerically and not alphabetically.
Not so here. All you need to do is tell Sort-Object which object property you want to sort. The object nature tells Sort-Object all it needs to know: where the information you want to sort is found, and whether it is numeric or letters.
You only have to tell Sort-Object which object property to use for sorting because PowerShell sends results as rich .NET objects through the pipeline. Sort-Object does all the rest automatically. Simply replace Length with another object property, such as Name or LastWriteTime, to sort according to these criteria. Unlike text, information in an object is clearly structured: this is a crucial PowerShell pipeline advantage.”
Aufgabe: Übersetzen Sie den englischen Text sinngemß.

Das Konzept der Pipeline wird auf alle Ausgaben angewendet, auch wenn dies nicht immer explizit zu erkennen ist. Auf alle Ausgaben wid das Out-Default-Cmdlet hinzugefügt, welches die Ausgabe in Textform bewirkt
Ein DIR ist damit eigentlich ein DIR | Out-Default.
Folgende Cmdlets stehen zur Verfügung.


10.1. Streaming vs Blocking
Bei der Kombination per Pipeline kommt schnell die Frage auf, wann denn jetzt ein einzelner Befehl tatsächlich umgesetzt wird. Dies hängt vom jeweiligen Modus ab, in dem die Pipeline arbeitet.
Sequentieller Modus:
In diesem Modus werden die Befehle streng hintereinander ausgeführt, d.h. die Eregbnisse werden erst dann per Pipeline weitergereicht, wenn es komplett berechnet ist. Dieser Modus ist langsam und speicherintensiv, lässt sich aber nicht immer vermeiden, z.B. beim Sort-Object-Cmdlet. So sind im unteren Beispiel die ersten beiden Pipeline sequentiell, während das 3. Beispiel streaming-fähig ist.
# Attention: danger!
Dir C:\ -recurse | Sort-Object

Dir C:\ -recurse | more

Dir c:\ -recurse | Out-Host -paging
Streaming Modus:
Hier wird jedes einzelne Ergebnis einer Berechnung sofort an den nächsten Befehl weitergereicht
10.2. Eigenschaften der Objekte
Um nicht nur die Standard-Eigenschaften der Objekte zu sehen, kann man sich mit Hilfe Format-Cmdlets einen Überblick über die Eigenschaften geben.
Dir | Format-Table *

Dir | Format-List *
Die Darstellung der Ausgabe kann mit Hilfe von 4 Format-Cmdlets erfolgen:
Get-Command -verb format
CommandType
-----------
Cmdlet
Cmdlet
Cmdlet
Cmdlet
Name
----
Format-Custom
Format-List
Format-Table
Format-Wide
Definition
----------
Format-Custom [[-Property] <Objec...
Format-List [[-Property] <Object[...
Format-Table [[-Property] <Object...
Format-Wide [[-Property] <Object>...
10.3. Ausgabe
Die Ausgabe spezieller Eigenschaften erfolgt dann durch Hintereinanderstellen der jeweiligen Namen. Wildcards sind erlaubt.
Get-Process i* | Format-Table name,pe*64

Skriptblöcke und künstliche Eigenschaften sind ebenso möglich:
Im unteren Beispiel ist $_ jeweils das aktuelle Objekt in der Pipeline.
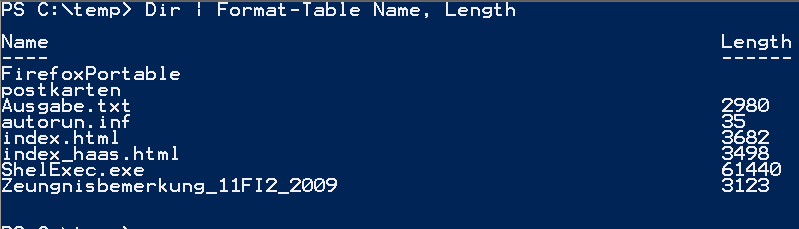
Dir | Format-Table Name, { [int]($_.Length/1KB) }

PS C:\temp> Dir | Format-Table Name, { [int]($_.Length/1KB) }

Name                                      [int]($_.Length/1KB)
----                                      ----------------------
FirefoxPortable                              0
postkarten                                   0
Ausgabe.txt                                  3
autorun.inf                                  0
index.html                                   4
index_haas.html                              3
ShelExec.exe                                60
Zeungnisbemerkung_11FI2_2009                 3
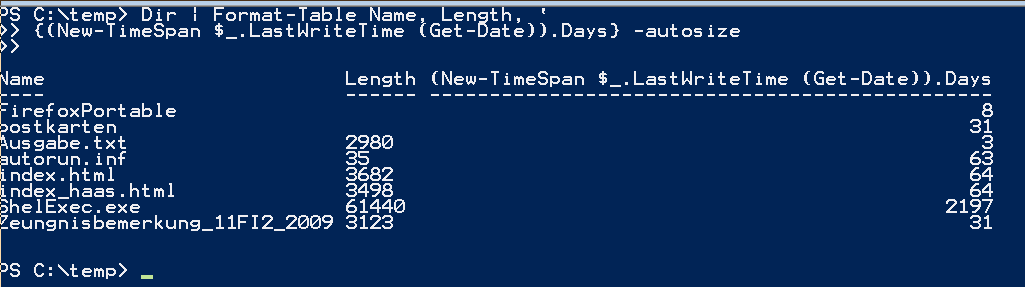
Oder man möchte wissen, wie alt die Dateien seit der letzten Veränderung sind. Dies liefert uns die Kombination der folgenden Befehle:
New-TimeSpan "01/01/2000" (Get-Date) //Zeitdifferenz zwischen heute und dem 1.1.2000

# gibt uns die Zeitdifferenz zwischen Heute und dem letzten Zugriff des jeweiligen Objektes
{(New-TimeSpan $_.LastWriteTime (Get-Date)).Days}


# kombiniert alles zu einer schönen Pipeline
Dir | Format-Table Name, Length, {(New-TimeSpan $_.LastWriteTime (Get-Date)).Days} -autosize
10.3.1. Ändern der Spaltenüberschriften
Die Spaltenüberschriften könhen geändert werden, wenn auch etwas umständlich
Dir | Format-Table Name, @{Label=”Größe”; Expression={([int]($_.Length/1KB))}} -AutoSize
Dir | Format-Table Name, Length, @{Label=”Differenz”; Expression ={(New-TimeSpan $_.LastWriteTime (Get-Date)).Days}} -autosize
Dir | Format-Table Name, Length, @{Label=”Länge”; Expression ={$_.Length}} -autosize
10.3.2. Optimieren der Spaltenbreiten
Wegen der Echtzeitausgabe kann Format-Table nicht wissen, wie breit eine Spalte zu wählen ist, um eine optimale Anzeige aller Werte zu erhalten. Man kann dies durch die Option -auto erhalten, verliert aber damit den Vorteil der Echtzeit.
column = @{Expression={ [int]($_.Length/1KB) }; Label="KB" }
Dir | Format-Table Name, $column -auto
Name
----
output.htm
output.txt
backup.pfx
cmdlet.txt
KB
--
11
13
2
23
10.4. Sortieren und Gruppieren der Pipeline-Ergebnisse
Bemerkung
So that you can make good use of Sort-Object and all the other following cmdlets, you must also know which properties are available for the objects traveling through the pipeline. In the last section, you learned how to do that. Send the result of Dir to Format-List * first, then you’ll see all properties and you can select one to use for subsequent sorting:
Dir | Format-List *
10.4.1. Sortieren
Das Sortierung erfolgt mit Hilfe des Sort-Object-Cmdlets. Falls nichts angegeben wird, sucht sich das Sort-Object-Cmdlet seine eigene Property zum Sortieren.
Eigene Sortierkriterien übergibt man mit der Property-Eigenschaft.
Dir | Sort-Object -property Length -descending
Dir | Sort-Object Extension, Name
Dir | Sort-Object Extension, Name -descending
#das geht nicht
Dir | Sort-Object Extension, Name -descending, -ascending
#wir müssen es an eine hash-table übergeben
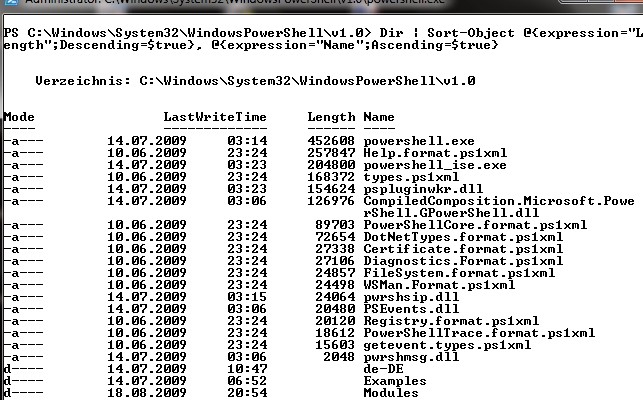
Dir | Sort-Object @{expression="Length";Descending=$true}, @{expression="Name";Ascending=$true}
10.4.2. Gruppieren
Mit Hilfe des Group-Object_Cmdlets können Sie Objekte mit gleichen Eigenschaften nach Ihrer Anzahl gruppieren.
Das folgende Beispiel gibt die Anzahl der laufenden und gestoppten Dienste zurück.
Get-Service | Group-Object Status
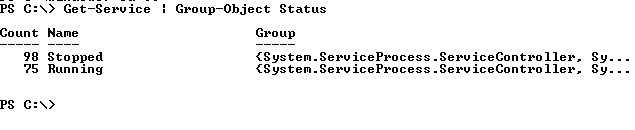
    $result = Get-Service | Group-Object Status
    $result[0].Group

    Dir | Group-Object Extension

    Dir | Group-Object Extension | Sort-Object Count -descending

    Count Name                      Group
    ----- ----                      -----
26                           {data, docbook, Documents, Dokumente und Ein...
18 .log                      {start.log, 20100318180017.log, Ve...
     9 .txt                      {ctapi_out_gr.txt, Ergebnis3.txt, ergebnisne...
     5 .pdf                      {Abschlussprüfung Winter 2002 - 2003.pdf, an...
     5 .jpg                      {last.jpg, presse_1.jpg, presse_2.jpg, press...
     2 .out                      {err.out, start.out}
     2 .zip                      {dvd_postkarten_16052010.zip, Stoffverteilun...
     2 .tex                      {start.tex, syntax.tex}
     2 .GDB                      {TEST10.GDB, TEST9.GDB}
     1 .hnd                      {sf.hnd}
     1 .ods                      {schueler.ods}
Group-Object kann nicht nur nach Eigenschaften gruppieren, sondern auch nach eigenen Ausdrücken. Das folgende Beispiel gruppiert alle Dateien, in Abhängigkeit, ob sie größer als 100 kByte oder kleiner sind.
PS C:\> Dir | Group-Object {$_.Length -gt 100KB}

Count Name                      Group
----- ----                      -----
78 False                     {cruisecontrol-bin-2.8.3, data, docbook, Doc...
23 True                      {Abschlussprüfung Winter 2002 - 2003.pdf, dv...
Das folgende Beispiel gruppiert nach der Anzahl des Vorkommens des jeweils 1. Buchstabens.
 PS C:\> Dir | Group-Object {$_.name.SubString(0,1).toUpper()}

 Count Name          Group
 ----- ----          -----
 3       C           {cruisecontrol-bin-2.8.3, config.sys, ctapi_...
10       D           {data, docbook, Documents, Dokumente und Ein...
 3       I           {inetpub, Intel, ihk_pruefung.pdf}
 4       M           {Miranda IM, music, mymiktex, myPass.kdbx}
10       P           {PerfLogs, Program Files, ProgramData, Progr...
 1       R           {RavenDB-Build-101}
13       S           {Sounds, steinam, schueler.ods, sf.hnd...}
 8       T           {TEMP, totalcmd, test.ps1, TEST10.GDB...}
 1       U           {Users}
 3       W           {Windows, WiresharkPortable, wepkeys.txt}
 2       .           {.emacs, .emacs~}
 5       A           {Abschlussprüfung Winter 2002 - 2003.pdf, Ak...
 3       E           {Ergebnis3.txt, ergebnisnew.txt, err.out}
 2       H           {haas.txt, haas_lanig.txt}
 1       K           {KOS_09_10.dav}
 4       L           {last.jpg, LA_ansichten_booklet (2).pdf, LA_...
Wie man sieht, ist jede Zeile ein eigener Array mit allen Objekten der jeweiligen Gruppierung. Man könnte dies nutzen, um eine alphabetische Liste aller Objekte auszugeben.
    Dir | Group-Object {$_.name.SubString(0,1).toUpper()} | ForEach-Object { ($_.Name)*7; "======="; $_.Group}

CCCCCCC
=======

Verzeichnis: C:\

    Mode                LastWriteTime     Length Name
    ----                -------------     ------ ----
    d----        06.06.2010     21:22            cruisecontrol-bin-2.8.3
    -a---        10.06.2009     23:42         10 config.sys
    -a---        01.04.2010     22:23          0 ctapi_out_gr.txt
    DDDDDDD
    =======
    d----        20.07.2010     23:00            data
    d----        21.08.2009     22:24            docbook
    d----        25.07.2010     20:28            Documents
    d----        31.07.2009     22:40            Dokumente und Einstellungen
    d----        24.02.2010     08:58            download
    d----        20.05.2010     18:09            dvd_postkarten_16052010
    -a---        23.11.2009     21:27        264 dfsd.nsd
    -a---        18.12.2009     21:20       7737 dienste.htm
    -a---        16.05.2010     20:30       1665 dsd.aup
    -a---        10.06.2010     08:30  289840446 dvd_postkarten_16052010.zip
    IIIIIII
    =======
    d----        18.08.2009     20:54            inetpub
    d----        18.08.2009     09:27            Intel
    -a---        02.08.2009     21:35     165025 ihk_pruefung.pdf
    MMMMMMM
Wenn man die gruppierten Objekte selbst nicht benötigt, kann man mit Hilfe des -noelement-Parameters Speicher sparen.
Get-Process | Group-Object -property Company -noelement

Count Name
----- ----
        2 Apple Inc.
        4
        5
        1 AVerMedia TECHNOLOGIES...
        1 AVerMedia
        3 Avira GmbH
   32 Microsoft Corporation
        2 Firebird Project
        1 Google
        1 Google Inc.
        4 Intel Corporation
        1 Irfan Skiljan
        2 Sun Microsystems, Inc.
        1 Tracker Software Produ...
        1 C. Ghisler & Co.
        1 http://tortoisesvn.net
10.5. Filtern
Mit Hilfe des Where-Objectes können die Objekte der Pipeline gefiltert werden.
PS C:\> Get-Service | Where-Object { $_.Status -eq "Running" } | more

Status   Name               DisplayName
------   ----               -----------
Running  AntiVirSchedule... Avira AntiVir Planer
Running  AntiVirService     Avira AntiVir Guard
Running  AppHostSvc         Anwendungshost-Hilfsdienst
Running  Apple Mobile De... Apple Mobile Device
Running  AudioEndpointBu... Windows-Audio-Endpunkterstellung
Running  Audiosrv           Windows-Audio
Running  AVerRemote         AVerRemote
Running  BFE                Basisfiltermodul
Running  BITS               Intelligenter Hintergrundübertragungsdienst
Running  Bonjour Service    Dienst "Bonjour"
Running  Browser            Computerbrowser
Running  CertPropSvc        Zertifikatverteilung
Das Cmdlet erwartet, dass man in geschweiften Klammern einen Powershell-Befehl übergibt. Das jeweils zu untersuchende Objekt kann über die Variable $_ angesprochen werden. Die Eigenschaft Status wird dann auf den Wert Running verglichen. Nur wenn dieses Objekt den entsprechenden Wert hat, wird es in die Pipeline gelassen.
Damit entspricht das Where-Objekt im Grunde der Formulierung einer Bedingung, die TRUE ergeben muss.
Get-WmiObject Win32_Service | ? {($_.Started -eq $false) -and ($_.StartMode -eq "Auto")} | Format-Table
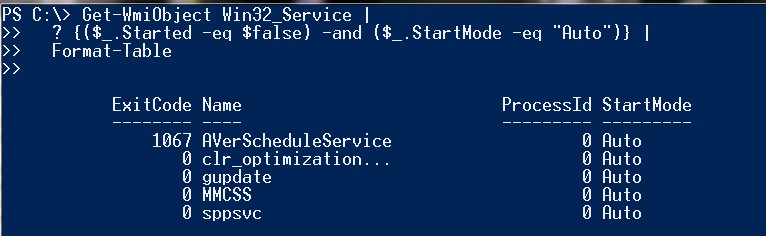
Das gleiche Ergebnis hätte man auch ohne Where-Objekt erhalten können, indem man WMI mit den korrekten Fragen füttert.
Get-WmiObject -query "select * from win32_Service where Started=false and StartMode='Auto'" | Format-Table

10.5.1. Begrenzen der Anzahl der Ausgabe
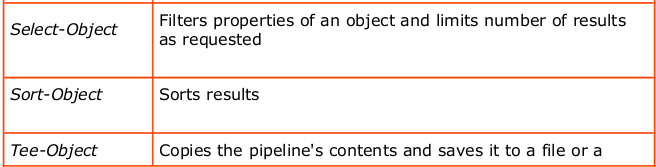
Select-Object kann neben der Ausgabe bestimmter Eigenschaften auch die Anzahl der ausgegebenen Datensätze begrenzen
# List the five largest files in a directory:
Dir | Sort-Object Length -descending |  Select-Object -first 5

# List the five longest-running processes:
Get-Process | Sort-Object StartTime | Select-Object -last 5 | Format-Table ProcessName, StartTime

# Alias shortcuts make the line shorter but also harder to read:
gps | sort StartTime -ea SilentlyContinue | select -last 5 | ft ProcessName, StartTime
10.6. Foreach-Objekt
Anstelle auf die Ergebnisse einer Pipeline zu warten, kann mit Hilfe des Foreach-Object-Cmdlets sofort auf jedes einzelne Objekt zugegriffen werden. Foreach-Object erwartet in geschweiften Klammern eine Anweisung, was es mit dem jeweiligen Objekt anstellen soll.
Foreach-Object kann wie das Where-Object als Filter verwendet werden. Dazu muss nur in der geschweiften Klammer eine Bedingung formuliert werden. Das Where-Object hat man eigentlich nur aus Beguemlichkeit geschaffen. Die folgenden Befehle haben alle das gleiche Ergebnis.
Get-Service | Where-Object { $_.Status -eq "Running" }
Get-Service | ? { $_.Status -eq "Running" }
Get-Service | ForEach-Object { if ($_.Status -eq "Running") { $_ } }
Get-Service | % { if ($_.Status  -eq "Running") { $_ } }
Bemerkung
ForEach-Object actually executes three script blocks, not just one. If you specify only one script block in braces after ForEach-Object, it will be executed once for every pipeline object. If you specify two script blocks, the first will be executed once and before the first pipeline object. If you specify three script blocks, the last will be executed once after the last pipeline object. The following will help you carry out initialization and tidying tasks or simply output initial and ending messages:
Get-Service | ForEach-Object {"Running services:"}{ if ($_.Status -eq "Running") { $_ } }{"Done."}
The three script blocks of ForEach-Object actually correspond to the three script blocks begin, process, and end, which you’ll examine in more detail
later
10.7. Zwischenergebnisse
Während einer Pipeline-Operation können mit Hilfe des Tee-Objektes die Zustände von Pipeline-Operationen in Variablen zwischengespeichert werden.
Get-Process | Tee-Object -variable a1 | Select-Object Name, Description ` |
Tee-Object -variable a2 | Sort-Object Name `

$a1
$a2
10.8. Ausgabe von Pipeline-Ergebnissen
10.9. Funktionen und Pipeline
10.10. Pipeline oder Schleife
Häufig ist ein Problem sowohl mit Hilfe der Pipeline als auch mit Hilfe der “normalen” strukturierten Programmierung möglich. Je nach Szenario kann es allerdings zu erheblichen Geschwindigkeitsunterschieden kommen. Folgendes Beispiel verdeutlicht den Zusammenhang.
#eine strukturierte Herangehensweise an das Problem
#Schleife mit if
#3 Minuten, 18 sec
#$zeit = Get-Date
#$result = Get-Content $env:windir\Windowsupdate.log
#foreach($zeile in $result)
#{
#       if($zeile.Contains("WARNING"))
#       {
#               $line = $zeile.Split("`t")
#               Write-Host ($line[0] + " " +  $line[1])
#               #Add-Content -Path "C:\ergebnisnew.txt" -value $zeile;
#       }
#}
#$diff = $zeit - (Get-Date)

#Write-Host $diff


#Das gleiche nun mit Pipes
#dauert 5 Min, 48 sec !!!
#$zeit = Get-Date

#Get-Content $Env:windir\WindowsUpdate.log | Select-String "WARNING" | Add-Content "C:\Ergebnis3.txt"
#$diff = $zeit - (Get-Date)


#auch mit Pipes kann es schneller gehen

#Write-Host $diff
$zeit = Get-Date
Get-Content $Env:windir\WindowsUpdate.log -readCount 1000 | Select-String "WARNING" | Add-Content "C:\Ergebnis3.txt"
$diff = $zeit - (Get-Date)
Write-Host $diff `
10.11. Pipeline/Filter und Funktionen
Funktionen können die Ergebnisse der Pipeline weiterverarbeiten. Es stellt sich lediglich die Frage, ob dies im langsamen sequentiellen oder schnelleren streaming-Modus vonstatten geht.
10.11.1. Sequentieller Modus
Im einfachsten Falle unterstützt eine Funktion nicht wirklich die Pipeline. Die Ergebnisse der Pipeline stehen in der automatischen Variable $input zur Verfügung. Im einfachsten Falle gibt die Funktion einfach die Inhalte von $input aus.
Function output
{
        $input
}
# The function, when invoked alone,
# will return nothing because no pipeline
# results are available:
output
# If you create an array in the pipeline,
# the function will output the array:
1,2,3 | output
1
2
3

# The function is completely indifferent to
# which type of data is in the pipeline:
Dir | output
Die Funktion soll nun aber abgeändert werden; alle Dateien mit der Endung .exe sollen in roter Farbe ausgegeben werden.
function MarkEXE
{
   # Note old foreground color
   $oldcolor = $host.ui.rawui.ForegroundColor
   # Inspect each pipeline element separately in a loop
   Foreach ($element in $input) {
        # If the name ends in ".exe", change the foreground color to red:
        If ($element.name.toLower().endsWith(".exe")) {
           $host.ui.Rawui.ForegroundColor = "red"
        }
        Else {
           # Otherwise, use the normal foreground color:
           $host.ui.Rawui.ForegroundColor = $oldcolor
        }
        # Output element
        $element
  }
  # Finally, restore the old foreground color:
  $host.ui.Rawui.ForegroundColor = $oldcolor
}

Measure-Command {Dir "c:\program files" -recurse | MarkEXE }

PS C:\Windows\system32> Measure-Command {Dir "c:\program files" ` -recurse | MarkEXE } `

Days              : 0
Hours             : 0
Minutes           : 0
Seconds           : 0
Milliseconds      : 706
..
Die Ausführung des Skripts dauert 706 msec.
10.11.2. Filter
Ersetzt man aber das Schlüsselwort Function durch das Wort Filter, dann ist die Ausgabe ca. um den Faktor 3 schneller.
PS C:\Windows\system32> Measure-Command {Dir "c:\program files" ` -recurse | MarkEXEFilter } `

Days              : 0
Hours             : 0
Minutes           : 0
Seconds           : 0
Milliseconds      : 189
..
Da die $input-Variable für Filter immer nur aus einem Wert besteht, macht ihr Einsatz innerhalb der Schleife wenig Sinn. Man kann Sie besser durch die Variable $_ ersetzen.
Filter MarkEXEFilter2 {
    # Note old foreground color
    $oldcolor = $host.ui.rawui.ForegroundColor
    # The current pipeline element is in $_
    # If the name ends in ".exe", change
    # the foreground color to red:
    If ($_.name.toLower().endsWith(".exe"))
    {
        $host.ui.Rawui.ForegroundColor = "red"
    }
    Else
    {
        # Otherwise, use the normal foreground color:
        $host.ui.Rawui.ForegroundColor = $oldcolor
    }
    # Output element
    $_
    # Finally, restore the old foreground color:
    $host.ui.Rawui.ForegroundColor = $oldcolor
}


PS C:\Windows\system32> Measure-Command {Dir "c:\program files" ` -recurse | MarkEXEFilter2 } `


Days              : 0
Hours             : 0
Minutes           : 0
Seconds           : 1
Milliseconds      : 77
..
10.11.3. Generische Filter
Filter sind beim Einsatz von Pipelines den Funktionen vorzuziehen, weil Sie die Ergebnisse der Pipeline sofort verarbeiten können. Nachteilig kann sich aber auswirken, dass alle Codeblöcke eines Filters immer wieder aufgerufen werden.
In unserem Beispiel wird immer die alte Vordergrundfarbe gespeichert und nach dem Durchlauf wieder zurückgesetzt. Dies ist zeit- und ressourcenintensiv.
Das Verhalten einer Funktion kann aber an diese Situation agepasst werden, indem man innerhalb einer Funktion spezielle Bereiche definiert.
- begin: (Initialisierung: Wird einmal beim Beginn aufgerufen)
- process:
- end: Aufräumen; wird einmal am Ende aufgerufen
Ein Filter ist für die Powershell nichts anderes als eine Funktion mit einem einzigen process-Block.
Die optimale Codierung des obigen Problems lagert deswegen das Speichern und Zurücksetzen der Farbein in den begin- bzw. end-Block aus
Function MarkEXE {
  begin {
     # Note old foreground color
     $oldcolor = $host.ui.rawui.ForegroundColor
  }

  process {
    If ($_.name.toLower().endsWith(".exe")) {
        $host.ui.Rawui.ForegroundColor = "red"
    }
    Else
    {
        $host.ui.Rawui.ForegroundColor = $oldcolor
    }
    # Output element
    $_
  }

  end {
     # Finally, restore the old foreground color:
     $host.ui.Rawui.ForegroundColor = $oldcolor
  }
}
Bemerkung
Das nächste Beispiel zeigt, dass ein Filter in Wirklichkeit eine normale Funktion mit einem process-Block ist.
filter Test { "Output: " + $_ }

Let's look now at the definition of the filter:
$function:Test
process {
"Output: " + $_
}
PowerShell hat die Filter-Anweisung in eine normale Funktion umgewandelt und den Code in einen process-Block gesetzt.
10.12. Zusammenfassung
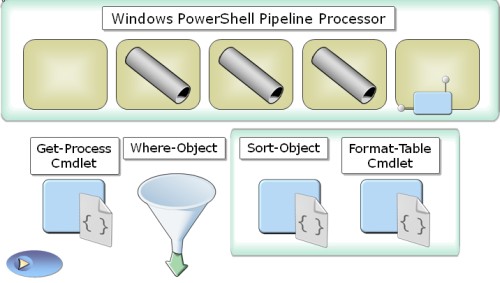
PowerShell uses a pipeline for all command entries, which feeds the results of the preceding command directly into the subsequent command. The pipeline is active even when you enter only a single command because PowerShell always automatically adds the Out-Default cmdlet at the pipeline’s end so that it always results in a two-member instruction chain.
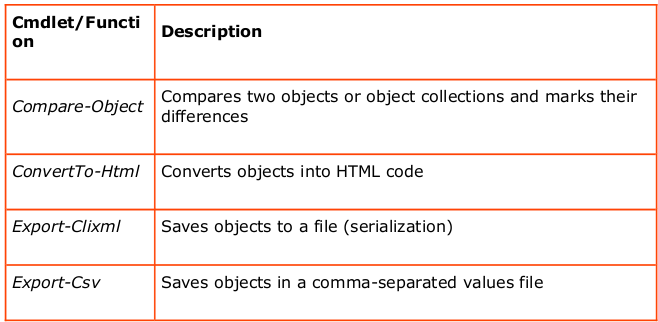
Single command results are passed as objects. The cmdlets shown in Table 5.1 can filter, sort, compare, measure, expand, and restrict pipeline elements. All cmdlets accomplish this on the basis of object properties. In the process, the pipeline distinguishes between sequential and streaming modes. In streaming mode, command results are each collected, and then passed in mass onto the
next command. Which mode you use depends solely on the pipeline commands used.
Output cmdlets dispose of output. If you specify none, PowerShell automatically uses Out-Host to output the results in the console. However, you could just as well send results to a file or printer. All output cmdlets convert objects into readable text while formatting cmdlets are responsible for conversion.
In addition to traditional output cmdlets, export cmdlets store objects either as comma-separated lists that can be opened in Excel or serialized in an XML format. Serialized objects can be comfortably converted back into objects at a later time. Because when exporting, in contrast to outputting, only plain object properties, without cosmetic formatting, are stored so that no formatting cmdlets are used.